※本ページはプロモーションが含まれます
Disclosure: This post contains affiliate links. If you buy through them, we may earn a commission at no additional cost to you. Learn more.
The short version: a One Piece Card Game turn is five fixed phases — Refresh, Draw, DON!!, Main, End — you gain 2 DON!! every turn up to a cap of 10, and you win by attacking your opponent’s Leader once they have zero Life cards left. Everything else in the rulebook is detail hanging off that skeleton.
That skeleton takes about ten minutes to learn. What takes longer is the part no quickstart sheet explains properly: the Counter Step, where the defending player spends cards out of hand to survive, is where most One Piece games are actually decided. This guide walks a full turn in order, shows the combat math with real Standard-legal cards, and finishes with the five rules mistakes that show up at every locals in the world. If you’re earlier than that and still deciding whether to play at all, start with our One Piece Card Game beginner’s guide and come back here.
- What the board actually looks like
- Deck construction, in one paragraph
- Setup and the mulligan
- The five phases, in order
- DON!! is two resources wearing one coat
- Combat, step by step
- Life cards and Trigger
- Keyword cheat sheet
- Five rules mistakes that actually cost games
- Why does going second feel so much better?
- What to buy once you know the rules
- FAQ
- Takeaway
- More Trading Card Game Guides
What the board actually looks like
Six zones, and you’ll use all of them every game:
| Zone | What lives there | Why it matters |
|---|---|---|
| Leader area | Your 1 Leader card | Your “hero”; it can attack, be attacked, and its Life value sets your starting Life |
| Character area | Up to 5 Characters at once | Your board; a 6th play forces you to trash one |
| Cost area | Your DON!! cards | Both your mana and your damage boost |
| Life area | Face-down Life cards | Your health bar — but they go to your hand, not the trash |
| Deck / DON!! deck | 50-card deck + 10 DON!! | Two separate stacks; running your main deck out is a loss |
| Trash | Discarded/K.O.’d cards | Referenced constantly by recursion effects |
The Character-area cap of 5 is the rule new players forget most often, and it’s not a soft limit — if you play a sixth Character, you must trash one of the six immediately. Aggro decks that flood the board are the ones that get punished by it.
Deck construction, in one paragraph
A legal deck is exactly 1 Leader plus 50 other cards, with a maximum of 4 copies of any one card number (parallels and alternate arts count as the same card number — an alt-art copy is not a fifth copy). Every card in the deck must match at least one of your Leader’s colors, which is why dual-color Leaders are so valuable for deckbuilding freedom. Alongside that you run a fixed 10-card DON!! deck, identical for every player.
One legality wrinkle that trips up returning players: since April 1, 2026 the game has a rotation built on the Block number icon printed on each card, and Standard currently allows Blocks 2–5 plus Block X. Older Block 1 cards are Extra Regulation only. Read the icon on the card itself rather than assuming based on the set, and check the current ban list and rotation rules before you register a list for a sanctioned event.
Setup and the mulligan
Both players shuffle, then:
- Place your Leader face-up in the Leader area.
- Draw 5 cards. You may mulligan once — return all 5, shuffle, draw 5 new cards. There’s no penalty and no card loss for mulliganing, which is why you should almost always ship a hand with no 1–3 cost plays.
- Set Life cards face down, equal to your Leader’s Life value (typically 4 or 5).
- Rock-paper-scissors or a die roll decides who goes first.
Here’s the Leader we’ll use as our example throughout — Luffy & Ace (ST30-001), the Red/Green Leader from the EX Luffy & Ace starter deck released June 2026. It’s a Life 4, 6000-power Leader, Block 5, and Standard-legal as of August 2026:
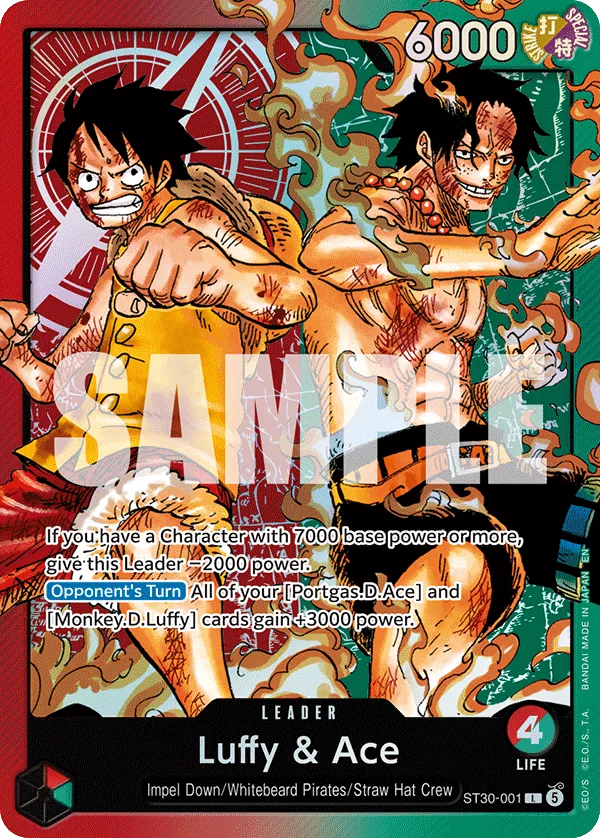
Note the tradeoff printed right on the card: it gives itself −2000 power while you control a Character with 7000 or more base power. That’s a genuine drawback, not flavor text — a 4000-power Leader gets attacked profitably by cards that a 6000-power Leader shrugs off, so the deck has to actively manage its own board to avoid turning its Leader into a target.
The five phases, in order
1. Refresh Phase
Return every DON!! you attached to your Leader or Characters last turn back to your cost area, then set all your rested (sideways) cards back to active (upright). Nothing is optional here and nothing triggers — it’s pure housekeeping, and it’s why “resting” a card is a cost you pay for exactly one turn.
2. Draw Phase
Draw 1 card. Exception: the player going first does not draw on their very first turn. If your deck is empty when you’d draw, you lose immediately — deck-out is a real loss condition, not a technicality, and slow control mirrors do end this way.
3. DON!! Phase
Place 2 DON!! cards from your DON!! deck into your cost area, active. Exception: the player going first places only 1 on their first turn. Your cost area caps at 10 DON!!, which is the game’s entire resource curve — no lands, no energy, no misses.
4. Main Phase
The open phase, and unlike most TCGs there’s no “Main Phase 1 / combat / Main Phase 2” split. You may do any of these, in any order, as many times as you can pay for:
- Play a Character or Stage by resting DON!! equal to its cost.
- Play an Event the same way.
- Attach DON!! to your Leader or a Character: each DON!! given grants +1000 power until end of turn.
- Attack with your Leader or with any active Character that wasn’t played this turn.
- Activate any
[Activate: Main]ability.
5. End Phase
“During this turn” effects expire and the turn passes. There is no maximum hand size in One Piece Card Game — you never discard down, which is a meaningful difference from Yu-Gi-Oh! and part of why holding Counter cards is viable.
DON!! is two resources wearing one coat
This is the concept that separates people who’ve played five games from people who’ve played fifty. Every DON!! in your cost area can be spent one of two ways each turn:
- As cost. Rest it to pay for a card.
- As power. Attach it to a Leader or Character for +1000 power this turn.
You cannot do both with the same DON!!, and that tension is the game. A turn where you have 6 DON!! is a turn where you’re choosing between a 6-cost bomb, two 3-drops, or a 3-drop plus a +3000 swing at the Leader. Decks are built around which side of that trade they want to be making.
Portgas.D.Ace (ST30-007) is a clean example of DON!! doing a third job — as an activation cost rather than cost or power:
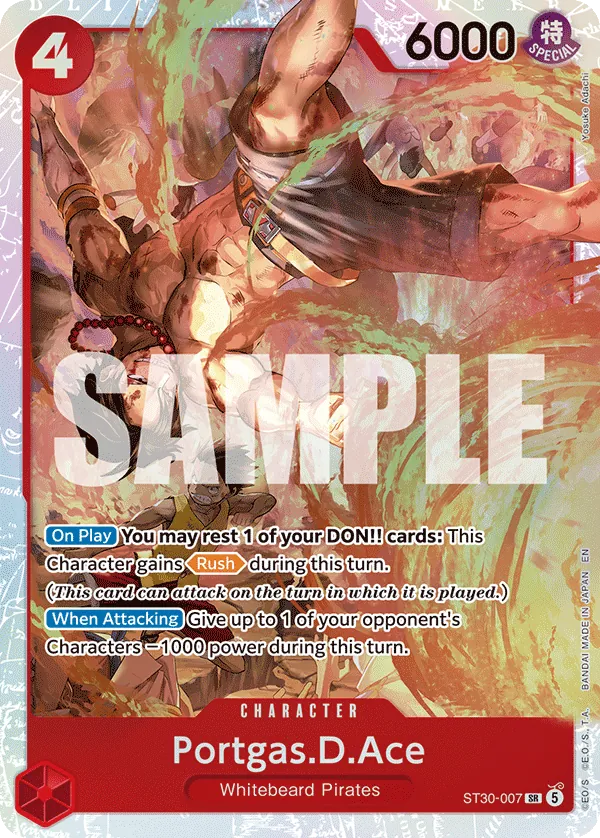
He’s a 4-cost 6000 whose On Play lets you rest 1 DON!! to give him Rush — the keyword that lets a Character attack the turn it arrives. Playing him and immediately swinging costs you 4 DON!! to cast plus 1 rested DON!!, meaning that “free” 6000 attack actually consumes 5 of your turn’s resources. New players consistently underrate that.
Combat, step by step
An attack resolves in a fixed order, and knowing the order is worth more than knowing any individual card.
Step 1 — Declare. Rest your attacker and name a target. You may attack the opponent’s Leader or any of their rested Characters. Active Characters cannot be attacked unless an effect says otherwise. [When Attacking] abilities trigger now.
Step 2 — Block. The defender may rest one Character with the Blocker keyword to make it the new target of the attack. It’s a swap, not a shield — the Blocker now eats the attack in place of the original target.
Step 3 — Counter. The defender may spend cards from hand to raise the defending card’s power. Character cards are discarded for their printed Counter value (+1000 or +2000, shown on the card’s left edge); Counter Events can be played for larger boosts, but only if you still have active DON!! in your cost area on your opponent’s turn.
Step 4 — Damage. Compare total power. If the attacker’s power is greater than or equal to the defender’s, the attack succeeds — ties go to the attacker. A Character that loses is K.O.’d to the trash. A Leader that loses takes 1 damage.
A worked example
You attack with Luffy & Ace (6000) and attach 2 DON!! → 8000 power, targeting your opponent’s Leader.
Your opponent has Borsalino (EB04-058) in play — a 5-cost, 6000-power Yellow Blocker from the Egghead Crisis Extra Booster:
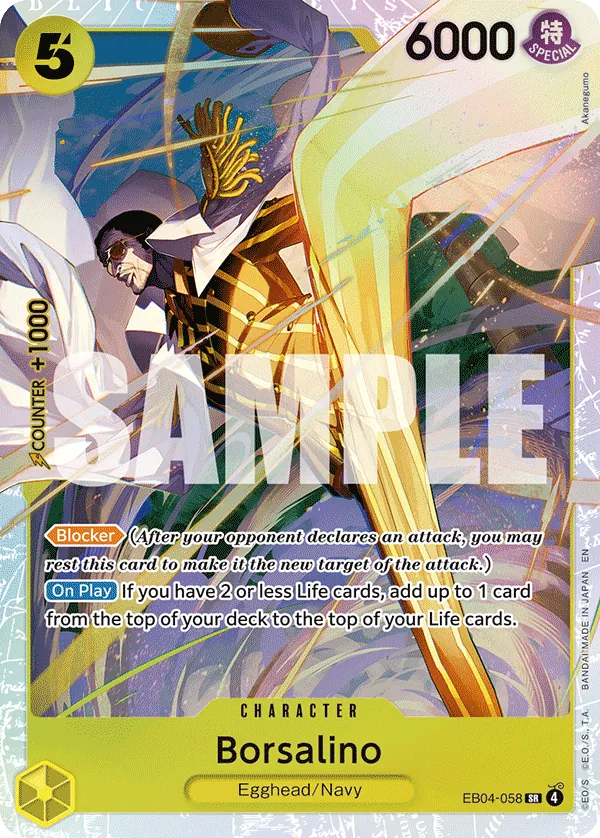
They rest Borsalino to become the new target. Borsalino is 6000 against your 8000, so he dies — unless they Counter. They discard a Character with +2000 Counter (8000 vs 8000, and ties go to the attacker, so that’s still not enough), then add “The Name of This Era Is ‘Whitebeard’!!” (ST30-015), a 1-cost Counter Event:
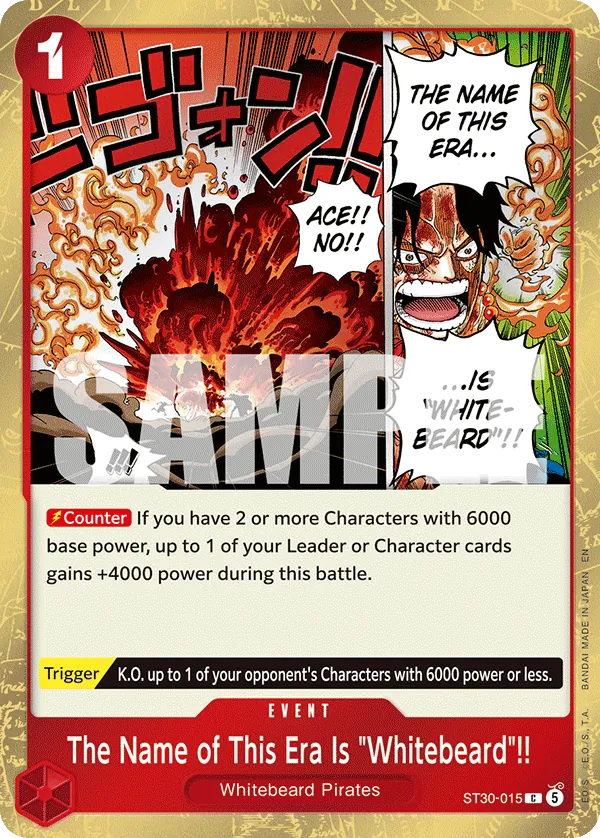
With 2 or more 6000-base-power Characters in play it gives +4000, putting Borsalino at 12,000. Your attack fails, Borsalino survives rested, and you’ve spent an attack and 2 DON!! to make them spend two cards. Whether that trade was good for you depends entirely on which player runs out of hand first — and that is the actual strategic core of this game.
Worth flagging on Borsalino specifically: he’s a genuinely strong Blocker, but he’s also half of a banned pair — a deck running OP07-115 “I Re-Quasar Helllp!!” cannot also run EB04-058. If you’re buying into a Yellow shell because you saw Borsalino winning tournaments, check the pairing rules first.
Life cards and Trigger
When your Leader loses a battle, you take the top card of your Life area into your hand. That’s the design decision that makes One Piece feel different from every other TCG: damage gives the losing player resources. A player at 1 Life often has a stacked hand full of Counters, which is exactly why “just race them” is a losing plan against good defensive decks.
Two modifiers to know:
- Trigger. If the Life card you take has a
[Trigger]ability, you may activate it immediately for free. ST30-015 above has one — K.O. up to 1 of your opponent’s Characters with 6000 power or less — so an attack can literally kill the attacker’s board on the way through. - Banish. An attacker with the Banish keyword sends your Life card to the trash instead of your hand. No card, no Trigger. That’s why Banish attackers price at a premium.
You lose when your Leader is attacked successfully and you have zero Life cards to take, or when you’d draw from an empty deck.
Keyword cheat sheet
| Keyword | What it does | Common misread |
|---|---|---|
| Blocker | Rest to become the new target of a declared attack | It doesn’t cancel the attack — it redirects it |
| Rush | Character may attack the turn it’s played | Doesn’t let it block any better |
| Double Attack | Leader takes 2 Life instead of 1 | Only relevant against Leaders, not Characters |
| Banish | Life card taken goes to trash, not hand | Also skips the Trigger |
| Counter | Discard from hand during Step 3 for +power | Counter Events also need active DON!! |
| Trigger | Free activation when taken as a Life card | Optional, and only from the Life area |
[On Play] / [When Attacking] / [Activate: Main] |
Timing windows | [On Play] won’t retrigger if the card is bounced and replayed for free — it costs you the replay |
Five rules mistakes that actually cost games
- Attaching DON!! after declaring an attack. Power is locked once you declare. Decide your total before you rest the attacker — this is the single most common judge call at locals.
- Forgetting active Characters can’t be attacked. If your opponent’s board is all upright, your only legal target is their Leader. Plan removal accordingly.
- Spending all DON!! on your own turn, then getting run over. Counter Events require active DON!! during your opponent’s turn. Tapping out means your Counter Events are dead cards.
- Treating Life as health. Going to 1 Life against a defensive deck can be fine; going to 1 Life against a Double Attack Leader is lethal next swing. Count their outs, not your hit points.
- Playing a sixth Character. The board caps at 5. Sequencing your plays so you never have to trash your own best Character is a real skill.
Why does going second feel so much better?
Because it usually is, at the margins. The player going first skips their first draw and only gets 1 DON!! on turn one, so they’re a full card and a full DON!! behind through the early game. What going first buys you is tempo — you hit a given DON!! count one turn earlier, so aggressive decks that want to be attacking on turn 3 still choose it.
In practice, most competitive players pick based on their Leader. Aggro Red and rush-oriented Green shells generally take the play; control and Counter-heavy Yellow decks generally take the draw. If you’re unsure with a new deck, take the draw — the extra card is the easier advantage to use while you’re still learning. For which Leaders are actually winning right now, see our OP-16 leader tier list, and if you want the color-by-color playstyle breakdown, our colors explained guide covers it.
What to buy once you know the rules
The honest answer for a brand-new player is a Starter Deck — a ready-to-play 51-card product with a Leader included, usually $12–$18 at a local game store. The six-color ST-31 through ST-36 wave from July 2026 and the EX Luffy & Ace (ST-30) deck used in this guide are all good on-ramps, and none of them are currently stocked by the Japanese export mall we link below, so buy those locally. Once you’ve played a few games and know which color you like, sealed boosters are how you deepen a real card pool.
A few options that are genuinely in stock as of August 27, 2026 (prices are Discovery Japan Mall listings in JPY, USD approximate at prevailing rates):
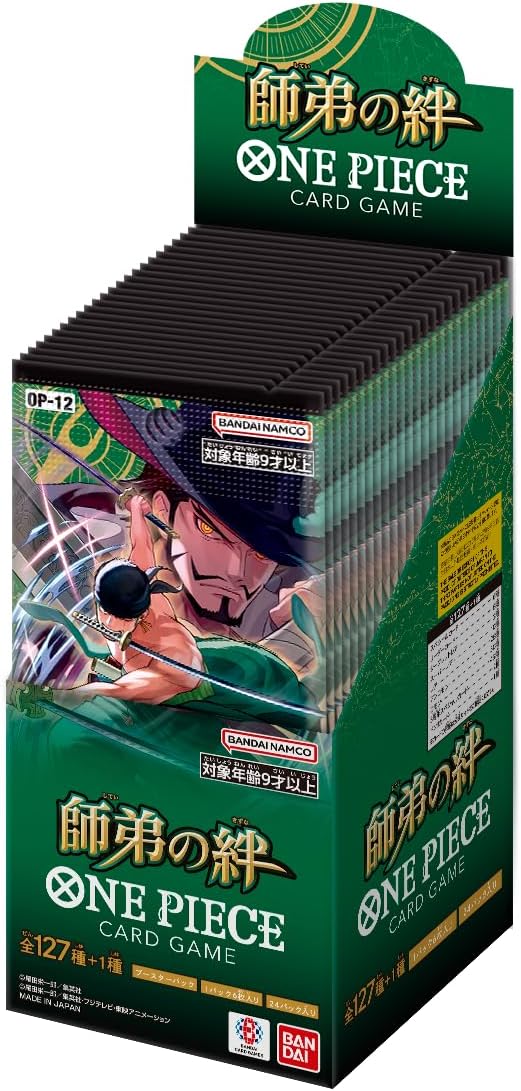
The best play-value box. BANDAI ONE PIECE Card Game — Bond Between Master and Disciple (OP-12) Booster Box runs about ¥13,392 (~$90) for 24 packs. OP-12 is Block 3, so its cards are Standard-legal on the current rotation schedule until roughly April 2028 — the longest runway of anything at this price point.

The caveat: it’s a Japanese-language print. Bandai’s card-text rules make those legal in most regions, but confirm with your organizer first — we go deeper in the Japanese vs. English buying guide. And 24 packs will not build you a tuned deck; for specific staples, singles are cheaper every time.
The reprint option. BANDAI ONE PIECE Card Game Premium Booster ONE PIECE CARD THE BEST (PRB-01) Booster Box is about ¥17,335 (~$117) for 10 packs, with every card in the product printed as a parallel. It’s a low-variance way to pick up recognizable staples and it looks fantastic in a binder.

The caveat: it’s a reprint set, so the Block icons vary card to card — PRB01-001 Sanji carries Block 3 and is Standard-legal, but don’t assume that’s true of everything inside. Check the icon on each card, and price it as collector product rather than as a competitive shortcut, because ¥17,335 for 10 packs is a high per-pack rate.
The anime-art option. BANDAI ONE PIECE Card Game Extra Booster Anime 25th Collection (EB-02) Booster Box sits near ¥21,080 (~$142). EB-02 cards are Block 3 and Standard-legal, and the anime-screencap art style is genuinely distinct from mainline sets.

The caveat: Extra Boosters are collector-first products. The competitive density is lower than a mainline OP-xx box, so if your goal is “cards I will actually play,” OP-12 above is the better buy at two-thirds the price. Sealed-product prices also move quickly, especially in the weeks around a new release — OP-17 The World’s Strongest Warriors lands in English on August 28, 2026 — and none of this is financial advice.
Ready to turn a card pool into a real list? Our competitive deck building walkthrough picks up from here.
FAQ
How long does a game of One Piece Card Game take?
Around 15–25 minutes for a typical game between experienced players, which is fast for a competitive TCG. Sanctioned matches are usually best-of-one at Store Tournaments and best-of-three at larger events with a 45–50 minute round timer, so the format rarely goes to time.
Do I need to attack every turn?
No. Attacking is entirely optional, and choosing not to attack is a real strategic option — you keep your Leader and Characters active, which means they can’t be targeted by attacks on your opponent’s turn. Passing on a bad attack to keep a Blocker upright is a standard play, not a waste of a turn.
Can I use Japanese cards and English cards in the same deck?
For casual play, yes, as long as both players agree. For sanctioned tournaments the rules are set by your regional organizer — Bandai’s general position is that a card is defined by its card number and current official text regardless of print language, but some events require a translation on hand or restrict mixed-language decks. Confirm with the specific event’s rules document before you register.
What happens if my deck runs out of cards?
You lose the moment you would draw from an empty deck. With a 50-card deck and one draw per turn that’s rarely the natural end of a game, but heavy card-draw engines and long control mirrors can genuinely deck a player out. It’s a loss condition worth tracking in grindy matchups.
Are the rules different in Japanese and English versions?
The gameplay rules are identical. What differs is timing: ban list and rotation announcements can carry slightly different effective dates by region, and until 2026 Japanese sets released months ahead of English ones. OP-17, releasing August 22 in Japan and August 28 in English, is the closest the two have ever launched.
Takeaway
The One Piece Card Game rules are genuinely simple on the surface — five phases, one resource, attack the Leader — and that’s most of why the game has grown as fast as it has. The depth lives in two places the quickstart guide won’t tell you about: the DON!! decision between cost and power every single turn, and the Counter Step, where the defender’s hand is the real health bar. Learn the phase order first, then spend your next ten games paying attention to how many cards your opponent spends to survive each attack. That’s the skill that actually separates players.
More Trading Card Game Guides
- Grading Naruto Cards in 2026: Is It Actually Worth It? (Naruto Card Game)
- Fusion World Evolve Explained: Rules and Real Risks (Dragon Ball Super Card Game)
- Pokémon Black Star Promos: What They’re Actually Worth (Pokémon TCG)
Comments